Loom Heaven

2015-08-06 13.40.36I recently returned from a vacation to the Red River Gorge area of Kentucky. We decided to make a little detour to the town of Berea on our way home. Berea has a lively artisan community, due in great part to the presence of Berea College where admitted students (primarily low income student from Appalachia) can attend tuition free by working 10-15 hours a week in the  Student Crafts program. They are producing traditional Appalachian style crafts in ceramics, woodworking, jewelry making, broom making, basket making and of course, weaving, which is the heart of their Student Crafts program.

2015-08-06 13.39.36I visited the weaving studio and talked for over an hour with Amy Judd, the Weaving Supervisor. She graciously showed me around and we talked about looms and weaving for over an hour. Amy shared with me some of the unique problems of running a large production studio that the usual home weaver doesn’t have. (Trying to get enough yarn of the same dye lot to warp 100 yards for a blanket warp!) I got some tips on warping my sectional beams on my looms from one cone of yarn rather than multiple packages by using a tension box with a chained warp that is two or three times the length of my needed warp. She fired up the AVL loom to show me the student designed draft they were working on for bread cloths with 10/2 cotton which will be a new item in their line of products. They weave two items side by side with cutting lines and sewing lines so they can have fringe on all 4 sides.

She also sat down at the loom with the fly shuttle, automatic advance and a sandpaper beam and roller system to show me how it worked.

This set up allows them to put on very long warps for production weaving. They do not wind the finished cloth onto a beam, but let it hang down until it is finished. Space is left for fringe and the weaver begins the next blanket. The blankets can be cut off as they are woven without having to retie the warp to a cloth beam, it is just held under tension between the beam and roller in front and never has to be retied.  This is a great time-saver.

2015-08-06 13.40.47 
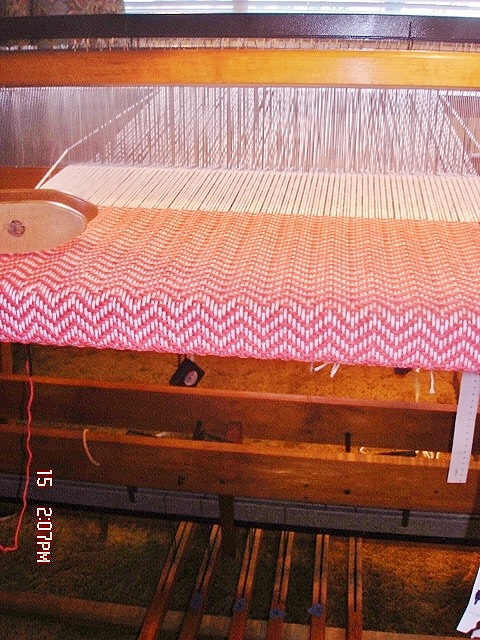
You can see the woven cloth hanging loosely in this picture on the left.  It takes a path between the sandpaper beam and a lower roller and keeps the tension on the warp that way.


tying on new warpThe studio has certain looms set up for certain projects and always tie the new warp onto the old one so that they don’t have to re-thread the heddles each time and introduce threading errors in the new warp.  In this photo on the right, one of the student workers is tying on a new placemat warp.

If you are interested in buying their products, you don’t have to go to Berea (although I highly recommend a visit there).  You can purchase their handcrafted items online.

Calculated Steps

I have an excel spreadseet to help me figure out the number of rows to knit for a foot on a CSM.  I have found a way put my calculator here on my website to help all the CSM folks out there.  It is included in this post and on a permanent page under Socks on the menu above. I hope it helps.  I would love to hear some feedback.  Does it work for you?  Do you have a problem with it?  Any feedback is welcome.  For best results, it does require making and washing a sample tube, figuring out your rows per inch, and figuring out how many rows will be in your heel and toe.

House Call

2015-07-08 10.43.04I have been going to Suzanne’s house on Wednesdays to teach her to weave on a floor loom.  She had been weaving on a rigid heddle loom on her own, and decided to buy a floor loom.  She found a used 4-shaft Macomber loom in okay shape, but it needed some TLC. I went over one day and gave her a written evaluation of what she had bought, what she still needed to do to get the loom in working order, and what she still needed to buy or make in the way of tools and accessories.

I showed her how to put the rachet brake back on the loom and sent her instructions to make lease sticks and a special raddle to work with her sectional beam.  She cleaned up the wood with Old English; de-rusted and painted the shaft; de-rusted and polished the heddle bars; sorted heddles on a jig so that the tops and bottoms were aligned, alternated in an A and B pattern and then replaced them on the heddle bars; replaced the dirty old old apron and dry rotted apron cords with some Texsolv then was ready to weave a couple of weeks later.  2015-07-08 11.04.19

beaming the warpThe second time I went to her home, I taught her how to wind a warp on a warping board and warp back to front onto the sectional beam without any special sectional warping equipment. The warp went on easily and before she knew it, she had the heddles threaded and the reed sleyed in the pattern from my Dishcloth Cotton Point Twill Towels project that I use when teaching people on their own equipment.  I call it a “get to know your loom” project.

The third time I was there, we troubleshooted for crossed threads and added the floating selvedges. She learned about the tie-up and treadling portions of the draft and how to change the tie-up to “walk” the treadles. We began with a plain weave hem and then she started weaving the first treadling pattern.  She is now weaving away on the towels and will treadle some different patterns. The next time I go back, we will cut them off and she will learn about wet finishing and hemming the towels.


009
003

Color and Weave Sampler

winding color and weaveOn Monday and Thursday evenings, Halie comes to my studio for weaving lessons. She is a student of Interior Design at DAAP at the University of Cincinnati. She is thinking about a Master’s Degree in Textiles and wanted to learn to weave. We started working on a rigid heddle loom since it is small and quick to learn about plain weave. It is also a loom she can afford, can easily transport and can easily keep in different student housing situations.  We will move on to a 4 shaft loom in the fall when she returns to school from a month of study abroad beginning in August.

She made two scarves that she direct warped to learn the basics, one with a multicolored yarn that gradually changed colors and one in a houndstooth check. Then we moved on to a color and weave sampler. We worked on the design together, basing it on some ideas in the books I have, and customizing it to work with one of my Cricket loom with a 10 inch weaving width, a 12 dent heddle and 8/4 cotton carpet warp.  Halie used a warping board for the first time to wind the two colors separately.

Loom is warped

She sleyed the rigid heddle holding the cross in her hand, first with the light color while leaving spaces for the dark color based on the warping plan we made. Then she filled in the dark color. You can see how the color sequence changes across the warp. The threading started out with a little bit of log cabin; alternating single ends of dark and light for about an inch, then alternating light and dark for a half inch, then back to alternating dark and light. After that, the sequences of dark and light changed to some other classic color and weave combinations.

Beginning to WeaveIt was a short warp and the color sequence to weave the weft was the same as the warp. Multiple iterations of color and weave effects can be observed in one small cloth and the sample is to be used as a reference tool for fabric design.


The sample was hemstitched on the loom, and now she needs to determine the edge treatment before the cloth is wet finished and pressed.  I sent the classic Virginia West book, Finishing Touches for the Handweaver, with her for the weekend to select one. I am excited to see what she comes up with!

Finished Sampler

Color Play

I am pretty sure I have decided on Bumberet for the structure of my next set of towels. Bumberet is a textured fabric with a ribbed appearance and plays well with color.

Color is always where I struggle.  I know what I like, but I have trouble knowing if they “go” together with an artist’s eye. I was never good in art class; I guess I never found my medium.  Crayons and paint never spoke to me the way fiber does.  I have learned to trust more that what I like usually turns out fine.  The color workshop I took at the weavers guild in the fall helped a lot to convince me to trust my choices.  I have a few tools I lean on such as a color wheel and the computer.

palette

I uploaded a picture of a beach volleyball game that I took in May and used an online tool to help pick out colors. I chose to select the medium blue color as the color I would choose to coordinate with.  I also thought I would put the suggested triad colors in. I didn’t have a limey green so picked a turquoise (one of the other colors in the generated palette) to be part of the triad with the blue and fuchsia which I had in my stash.  I also picked a gold to make the split complement. I think 4 colors is plenty for the warp, but may play with adding a neutral tone in there too.

turquoisegreen  gold fuschia bermudablue

Then I looked to my other colors of 8/2 cotton for weft colors knowing that I wanted to weave towels with only one shuttle for weft. I like to keep the weft in darker values to liven and help the warp colors pop.  If I chose white or light pastels they would wash out the warp colors. You can see how the gray in the last image washes it out a bit.   I changed the weft colors around to see what each looked like.  I chose black, navy, purple, then a lighter blue and gray. My favorites so far are the navy and the purple.  What do you think?

black weft  Navy Weftpurple weftbluegray weft gray weft